Leaking Roof

29 06 2014

Last week we experienced a lot of heavy rain. On one of the nights when it was raining we were sitting watching the TV when we noticed some water on the ledge in the opening between our family room and rumpus room. We immediately asked our kids what they had spilt there and proceeded to clean it up. Not long after that when it had started to rain again, the ceiling above where the water had been started to leak. As the rain became heavier, the more the water dripped from the ceiling.

Chris got up into the ceiling to see what was happening in the roof and it appeared that the rain water was coming in at the point where our double story ended and the single story at the back to the house began.

We proceeded to contact Metricon to advise of the problem. The first response was that it was due to storm damage. With a bit of persistence, they agreed to send someone out to have a look into it.

Two days ago we had Damian, a Metricon maintenance person to look at the issue with a leaking roof.  Damian only spent around 10mins at our place with most of it talking to Chris.  He didn’t get on the roof or  into the roof space to investigate but rather  took some photos from the ground of the roof area and made a judgement from the photos.   He said there were some leaves that could be causing the issue.

We had only just recently cleaned the gutter out and the leak was still occurring AFTER the gutters were cleaned.  The reason given was that water can run in many different directions and he implied it can even run uphill a significant amount.

One of the leaks occurred during the warmer/summer months not long after handover – so I am not sure if Storm damage applies here when there was no storm.

Here are some photos taken the same afternoon (Friday) Damian visited:


roofleak_2

Gutters with only a few leaves – enough that it could cause the gutters to block (so Metricon claims)

roofleak_4

Gutter downpipe – seems clear

roofleak_1

Metricon claims there’s a leaf (circled) that could cause water to leak into the roof

Roof - 1200px

Inside the roof space – you can see water leaking through onto the ceiling above the Rumpus Room

Roof2 - 1200px

Closeup of the leak – you can see water drops running down

Family-Rumpus Opening - 1200px

Water drops inside in the Rumpus Room

roofleak_3

Enough water caught to fill a take away container


Immediately after Damian left, we cleaned the gutters (again) and sprayed down the downpipes to clear any potential blockages – the gutters look clean and brand new now.

Once again this evening while it was raining, the ceiling started leaking.  The rain wasn’t overly heavy this time but yet the water still got into the roof space. It seems as though this happens when the wind is blowing in a certain direction. So despite the visit from Metricon and with clean gutters and mild rain, the roof still leaked again. If we didn’t put a bucket underneath the leak, the water would get on our couch, our carpet and children’s toys. Given we have been in our house for less than a year and plan to live here for a long time to come, we would hope that it is not Metricon’s expectation that we just put up with this issue and grab a bucket every time the wind blows the rain in a certain direction!!

Damian said if the water leaked again after we cleaned the gutters, they will fix it.  Now that it has leaked again we will following up Metricon again tomorrow to have this issue fixed.

Here are some photos taken today (Sunday) with the clean gutters (and the roof still leaked).


Clean gutters and the roof still leaks!

Clean gutters and the roof still leaks!

Clean downpipe area

Clean downpipe area

Roofspace very wet - the insulation is soaked

More leaking – roofspace very wet – the insulation is soaked

Waterdrops inside the Rumpus Room

More leaking – waterdrops inside the Rumpus Room


C&K


Landscaping Day 250 – Hard landscaping completed

17 05 2014

Ben and the guys from Daviscapes have finished the hard landscaping.  All the retaining walls, decking, fences, concreting, driveways, irrigation etc are done.  Perhaps one of the most exciting developments to date has been having the turf laid.  For the past two years we have been looking at dirt and mud and prior to that where we lived had concrete paving. The greenery is certainly a welcome addition.

There are only a few things left to be completed which include finishing the wire on the front fence – which looks amazing.  The plants (can’t wait), clothes line installation, letterbox and outdoor lighting.  We also decided as a last minute inclusion to get Ben to incorporate a built-in BBQ area under the alfresco and have asked him to help with putting up the kids cubby house that we got from Matt’s Home and Outdoor Designs.  We were lucky that there was enough room to fit one of the smaller cubbies given that we don’t have a lot of space due to the slope of our block – we got the Townhouse with 900mm elevation. The great thing about working with Daviscapes has been their adaptability during the entire process. While we started with a clear plan, we have been able to make some changes along the way which Ben and the team have been really great at accommodating.

We are really happy with the way things have turned out and Ben and the team have been very meticulous  in their work. The finishes and attention to detail have been terrific.  The most recent work was oiling the decking on the front and in the alfresco which has turned out great.

Here are some photos:

20140517-1

Front fence looks great

20140517-4

20140517-2

Front retaining wall – the stone work complements the house facade


20140517-3

Bluestone paving up to the front decking and door

20140517-6

Front decking freshly oiled

20140517-10

20140517-9

We have grass!!!!

20140517-7

Steppers

20140517-8


20140517-17

Close up of the oiled decking – wood is spotted gum

20140517-5

Side gate

20140517-16

Rear decking

20140517-15

Rear lower retaining wall with decorative wood

20140517-13

Closeup of the decorative wood on retaining wall

20140517-22

Alfresco area

20140517-20

Fences painted to match roof (Woodland Gray)

20140517-19

Retaining walls painted to match roof (Woodland Gray)

20140517-18

Purpose built shed

20140517-14

View of the stairs to top of backyard

20140517-12

View of the alfresco from top level of yard

20140517-11

View towards alfresco and rear of house

20140517-21

Steppers in the backyard


Landscaping Day 106 – More backyard decking

24 12 2013

landscaping-day106-2

More work on the back decking the last few days.  It is at a stage that we can use it – just in time for big family Christmas.  With the weather forecast to be 30 degress, we will sure make good use of the outdoor space.  The spotted gum is looking really good.

We requested to have decking screws to install the decking to the subframe as these will not come loose as easily, last longer and require lower maintenance.  Previously when we just had nails, we found that they came loose and consequently the decking lifted up from the frame.

landscaping-day106-11

Bi-fold doors opening up between dining room and alfresco.

landscaping-day106

Spotted gum decking up close. You can see the decking screws used to install the deck.

landscaping-day106-8

landscaping-day106-3

The decking instantly makes the backyard look bigger.

landscaping-day106-9

First part of the steps being constructed.

landscaping-day106-10

In the next few photos you can see extra concrete laid to complete the circular area outside the rumpus room window and decking.

landscaping-day106-4

landscaping-day106-5

landscaping-day106-6

landscaping-day106-7

C&K


103 Days of Landscaping in Review and Water Meter Relocation

21 12 2013

bobcat
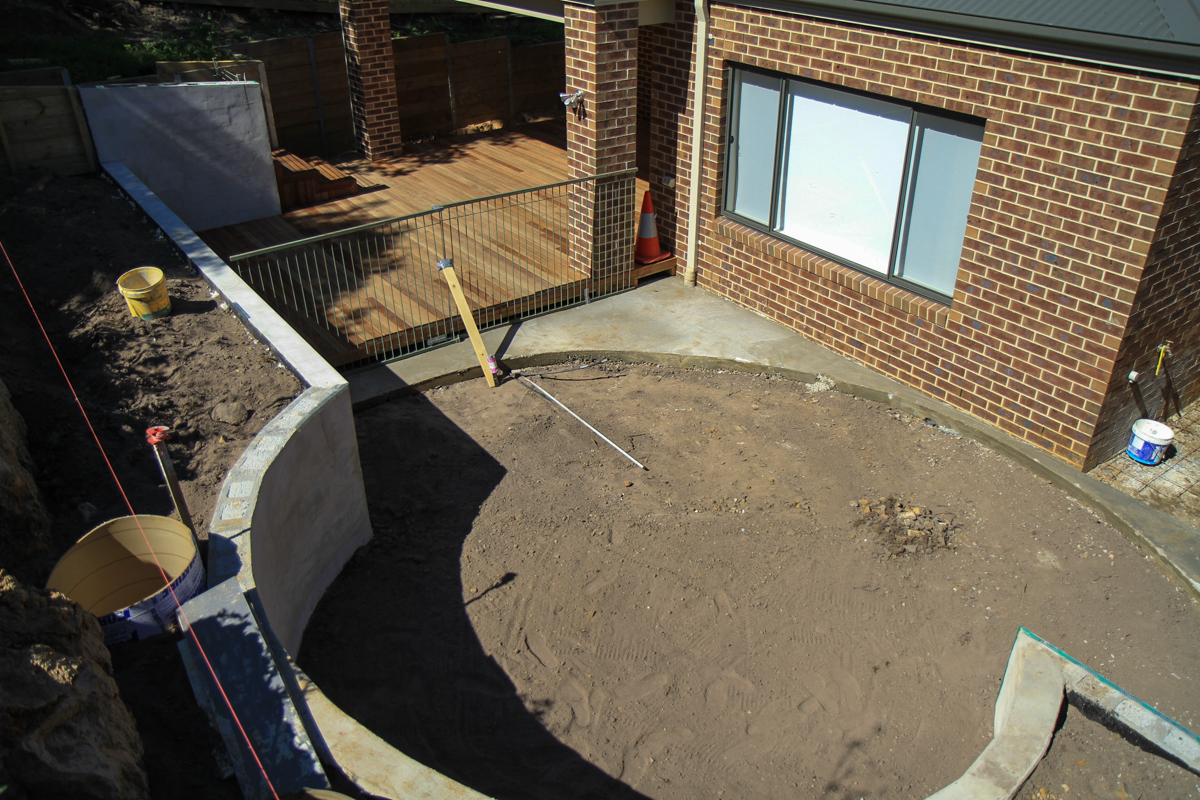
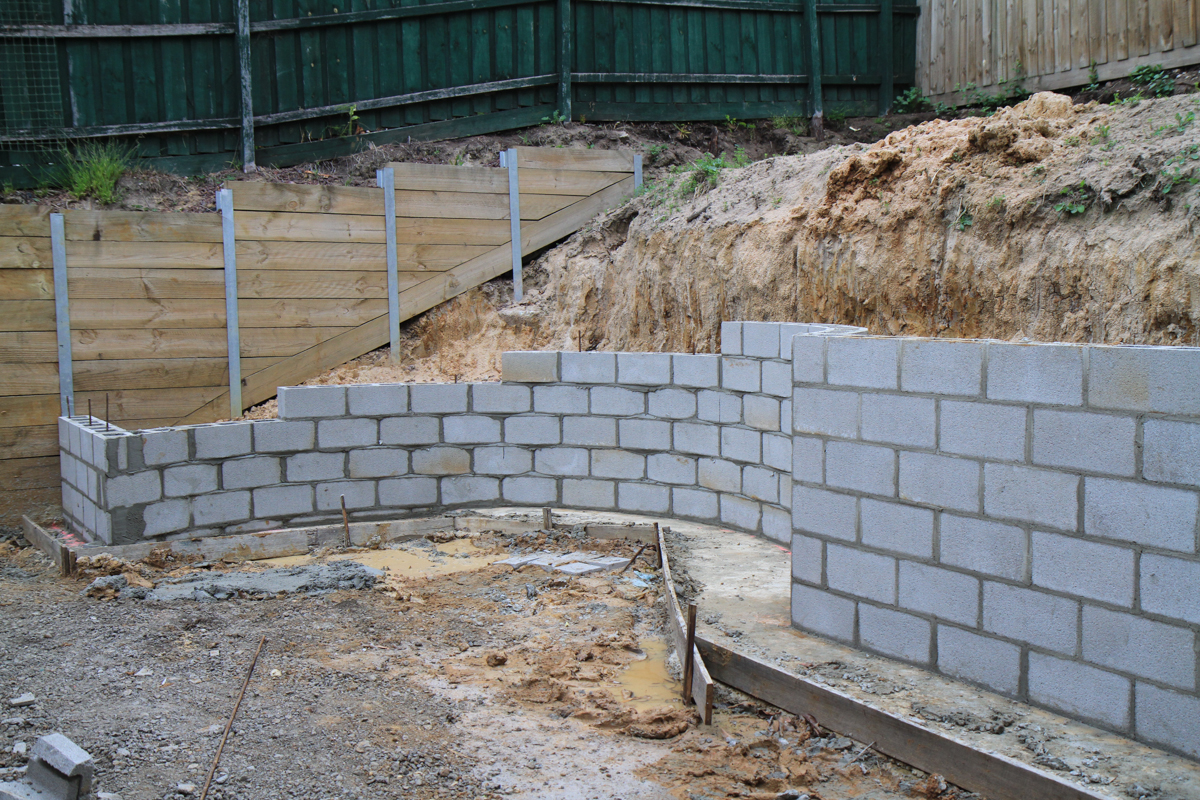
Here’s our first blog post since we started the landscaping construction.

We had to re-locate the water meter as it was in the middle of where the new driveway would go.  The process of moving the water meter was a pain due to some stuff ups by Select Solutions who are the contractors employed by the water authority, Yarra Valley Water, to officially re-locate water meters.  If the water meter was to move < 600mm your own plumber could do the move, be as we were relocating it a good few meters away so it had to go through proper authorities.  The cost to move the meter was around $1,900 (booked through Reece) and involved moving the meter to the new location and then connecting the meter and tap to a new mains located under the road.

The best information I could find about relocating water meters is in the document Water Metering & Servicing Guidelines (Section 6.3, page 11).

We completed our landscaping design with Ben from Daviscapes back in early July and landscaping construction started on 9 September.  Its been 103 days since we started and we are pleased we are making some progress after some rain delays during October.  We can now start to see the landscaping take shape and its starting to look great.

Below are some pics taken over the course of the construction.

Landscape Design v3. Copyright @ Daviscapes.

Landscape Design v3. Copyright @ Daviscapes.

Before

Picture of the front before any landscaping works

01-landscaping

The backyard before any earthworks. You can see the pink lines outlining the landscaping.

escavation

Digger in action. I think Ben calles it Daviscrapes!

02-landscaping

Some of the dirt excavated from the back – there was a lot!

03-landscaping

Back retaining wall foundations and brick going up

04-landscaping

05-landscaping

06-landscaping

07-landscaping

We like the curved wall – it softens the hard structure a bit. The curve was put in so we can put a trampoline in.

08-landscaping

09-landscaping

17-landscaping

Render now applied. There was also some waterproofing underneath.

1484171_596666013702390_867419096_n

One of the guys from Daviscapes hard at work.

15-landscaping

Rear decking going in. Makes the alfresco area feel bigger.

24-landscaping

18-landscaping

View from inside through the bi-folds towards the alfresco area and steps.

The boys unloading the digger from the truck

The boys unloading the digger from the truck

10-landscaping

Front decking frame going in.

11-landscaping

Front feature retaining wall

13-landscaping

View of the front of the house.

We selectected Spotted Gum for the decking timber.  The finish of the wood is very smooth and the colour texture of the wood is great.  Another great selection.

23-landscaping

Front decking almost complete

20-landscaping

View of the front with concrete path base.  No more walking over dirt into the house!!
You can see Santa on the balcony.

19-landscaping

View from the balcony

12-landscaping

The retaining wall area – nice space.

21-landscaping

The walk up to the front door. We are very happy with the white plantation shutters for the sidelight windows.

daviscapes_sign

Nice going Daviscapes! 🙂

C&K


Day 406: 90 Day Service Inspection

18 12 2013

Today we met Paul, Metricon’s Service and Warranty Supervisor to go through the 90 day service items.  Its been 131 days since we got the keys and we have been extremely happy since moving into Our Nolan. The main issue has been the floorboards – there are a few damaged edges, gaps and general unevenness between floorboard pieces. The other items have been minor issues which haven’t detracted from the overall enjoyment of our home.

The list of items needing attention include:

  • Numerous paint defects (cracking and splitting)
  • Loose bath spouts
  • Dripping tap in power room
  • Incorrect shower hose in powder room and bath rooms
  • Shower rail bracket installed upside down
  • Silicon touch-ups
  • Bi-fold doors squeaking and not smooth
  • Ventilation return air vents not flush with ceiling
  • Floorboard issues (gaps, damaged edges, general unevenness)
  • Loose carpet near balcony doors
  • Tight latch on French Doors

Some of the items were fixed yesterday as part of Metricon’s New Home Service Inspection where they check thinks like doors and windows.  But most of the items will require a service call to a supplier of tradie to rectify.

C&K


Day 275: Our Nolan is now “Our” Nolan!!!!

9 08 2013

We have keys!!!!   Today was handover day.  It was very exciting to finally take the keys after 275 days of build time.

Last week has been very busy as we organised home insurance, final milestone payment, organising trucks for the move and calling in familiy and friends to help with the move.  We have also been busy finalising our LED downlight selection.

This morning I ordered 3 cubic metres of crushed rock so we can avoid walking and driving on mud that is currently our front yard.

New Home Inspections did a re-inspection of the pre-handover defects today just prior to our handover with Simon.  There’s were still a few things that need to be fixed and Simon will be following these up next week.

Curtains will go in tomorrow and Monday and the next 3 main activities for us are:

  • Move house
  • Finalise quote and book in a landscaper
  • Book in electrician to install LED downlights

C&K


Day 261: Final (Pre-Handover) Inspection

26 07 2013

home-final-inspectionWe originally had booked in for the final pre-handover inspection on Wednesday, but Metricon had to move it to today (Friday) as they wanted to get more painting fixes done before presenting to us.

It was busy at the house when we arrived with Simon, our Site Manager going over things with one of Metricon’s QA guys (Mick).  Theo from New Home Inspections (who was doing our independent inspection) was also there, and a few tradies doing maintenance works such as putting locks on doors.

Its been a few weeks since we have been inside the house and it was very exciting to see that we are so close to finishing. Having an independent inspector was good as he would pick up any structural or building regulation issues which we would not know about.  Theo did pick up a few items, one of the major ones was the surface finish and cracks in the garage which will need to be topped up with more cement concrete.

box_red_dots

Armed with a box of red dots, we went through the house with Simon inspecting the finishes.  Anywhere we found a fault (eg paint blemish, cracks, holes, damage etc) we put a red dot so they can be fixed prior to PCI (Practical Completion Inspection). Metricon will have a combined list of defects from their QA person, New Home Inspections Report and our list of defects to fix next week.

It was good to see Simon pick up a few issues as well as it shows he wants us to have a quality house.  Some of the defects we found included:

  • Scratches in floorboard (hopefully these can be fixed up well).
  • Damaged fly wire screens.
  • Front door lock mechanism needed adjusting.
  • Light switch not working
  • Power switch plate had a white plate when it should have been a metal/chrome plate.
  • Scratch in powder room mirror.

Early next week will also see the final electrical items go in, including all the kitchen appliances, hot water system, outdoor fan and ducted vacuum.

Here’s a few photos we took today:

Our pretty house!!

Our pretty house!!

Pillar lights

Pillar lights

Pillar Lights from another angle

Pillar Lights from another angle

Today was the first time we saw the stain on the stairs which has definitely finished off the stairs quite well.

Stained stairs

Stained stairs

Close up of stairs

Close up of stairs

View of the stairs from above

View of the stairs from above

View of stairs from leisure room.

View of stairs from leisure room.

Bi-fold doors complete with door handle

Bi-fold doors complete with door handle

Close up of door handle on bi-fold

Close up of door handle on bi-fold

Laundry splash back

Laundry splash back

Laundry splash back

Laundry splash back

Lock and handle on sliding door to powder room

Lock and handle on sliding door to powder room

Study 'feature' door now complete with handle

Study ‘feature’ door now complete with handle

Balcony

Balcony complete with wire balustrades

Some of the dots throughout the house indicating some maintenance need

Some of the dots throughout the house indicating a defect

Aircon unit

Aircon unit

Speaking with Simon, we are his last house in the Northern Suburbs.  Due to some changes at Metricon he is now working out in the East (around the Wantirna area).  Whoever has him now will be in good hands.

We also got the final invoice from Metricon’s office today.

We need to start packing soon….

C&K


Day 253: Full frontal exposure

18 07 2013

The scaffolding has come down and we can finally see our beautiful house from the street in full frontal.  Doesn’t it look pretty. 🙂

Our Nolan from the street

View of Our Nolan Plantation Facade from the street

Balcony

Close up of Balcony

The gables are now how they should be.  When they were first installed there was no recess.

Gables

Gables

C&K


Day 252: Final Inspection Next Week

17 07 2013

home-final-inspectionWe got a phone call from Simon to give us an update since last Monday and to say we will be ready next Wednesday 24th at 8am to do a final inspection!!!  It’s getting very close to the end now as the final touches are being applied to the house.

We will organise our independent inspection with New Home Inspections to perform an inspection at the same time as us.  That way we can provide Metricon with a combined list of items to fix prior to handover.

Earlier this week, work on replacing the RHS paling fence started.  This should be completed later in the week.

We are awaiting quotes for landscaping so we can line this up straight after handover.

Next on the list is to start getting quotes for house insurance.


C&K


New Nolan Facades by Metricon

12 07 2013

A recent visit to the Nolan on Metricon’s website has  uncovered several new facades – Verve, Provincial and Alessi.  We like the Verve – modern, contemporary and fresh and looks like it has a reasonable balcony.

The Provincial facade is has some aspects of the Bordeaux feel which will appeal to people living in an area with some older style homes.

One thing we would like to see added to Metricon’s Lookbook is a list of available displays with different facades to make it easy to locate a particular facade to visit.

Nolan Verve Facade

Nolan Verve Facade

Nolan Provincial Facade

Nolan Provincial Facade

Nolan Alessi Facade

Nolan Alessi Facade

C&K